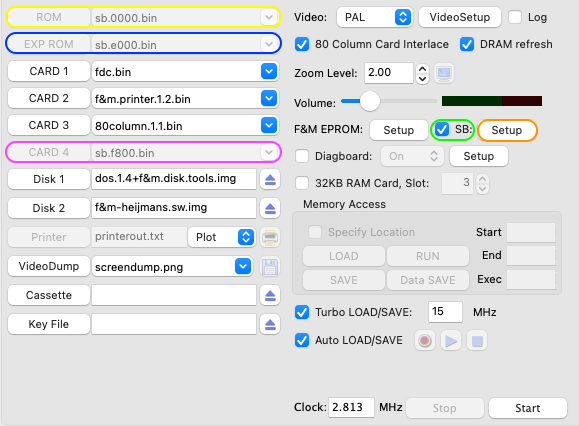
For more information about the Super Board (SB) project please see our COMX Super Board page.
To run the COMX emulator with the Super Board, select the SB checkbox (green ellipse) which is the default setting. This will disable the ROM (yellow ellipse), EXP ROM (blue ellipse) and CARD 4 (magenta ellipse) fields as they are now controlled by the SB settings.

The SB ROM files can be controlled and changed via the SB 'SET-UP' button (orange ellipse), under the ROM Files tab. In principle these do not need to be changed.
To open the Super Board Settings window press the SB 'SET-UP' button. The settings window that will open contains 4 tabs (yellow ellipse) as described in following sub chapters.
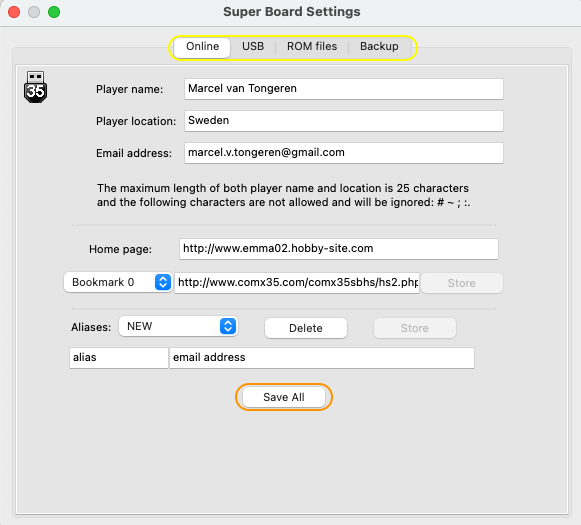
All tabs contains a 'Save All' button (orange ellipse), make sure to press any of these to save changes made.
Note: while running the COMX emulator no setting can be changed in the Online, USB and ROM files tab whereas the COMX emulator has to be running to be able to delete the backup files in the Backup tab.
The online tab shows all settings related to USB commands using online connections, i.e. USB HSWEB, EMAIL and BROWSER.
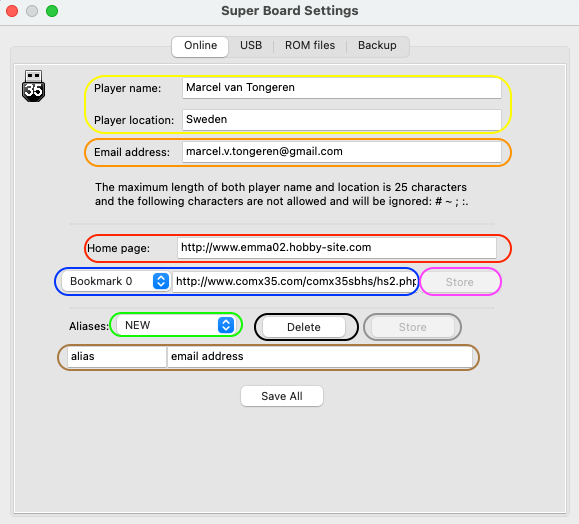
Define the Player name and location (yellow ellipse) as used in the USB HSWEB command. Note that the maximum length of both player name and location is 25 characters and the following characters are not allowed and will be ignored: # ~ ; :.
To be able to get your email address specified as sender with USB EMAIL make sure to fill in a correct and valid email in the ‘Email address’ field (orange ellipse).
Home page (red ellipse) and bookmark (blue ellipse) fields are used by the USB BROWSER command and can be shown on the COMX by pressing the ‘H’ or 0 to 9 keys during a browser session. Max length of these fields is 126 characters. To store a bookmark press the ‘Store’ button (magenta ellipse) which will be enabled when typing text in the bookmark text field (blue ellipse).
Email address and aliases are used by the USB EMAIL command. Any defined alias can be edited when selected by the Aliases choice button (green ellipse). A new alias can be defined when NEW as well as ‘alias / email address’ (brown ellipse) is shown. To store the alias press the ‘Store’ button (grey ellipse) and to delete the alias press the 'Delete' button (black ellipse).
The USB tab shows all settings related to USB commands: CD, CHAR, BSAVE, DSAVE, PSAVE, DISKTOIMG, SYSSAVE and NSAVE.
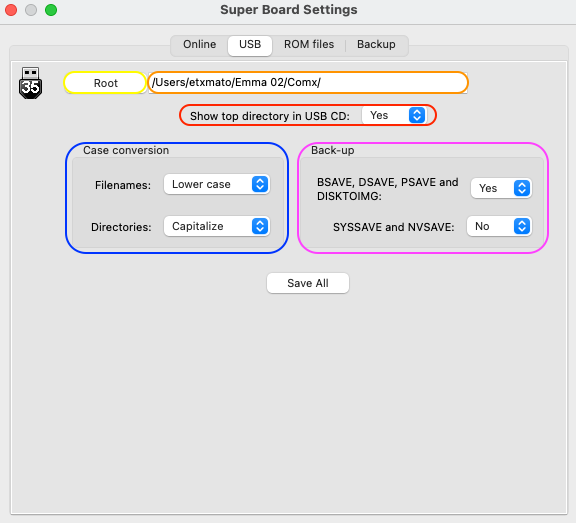
Root – Either use the ‘Root’ button (yellow ellipse) or change the path manually (in orange ellipse) to change the root directory seen from the COMX. The selected root is the highest directory level that can be accessed by the COMX. This is either shown as directory or top-directory on the COMX (depending on ‘Show top directory in USB CD’ setting)
Show top directory in USB CD – Select Yes / No (red ellipse), ‘No’ will not show the root directory (PR USB CD will show '/'), ‘Yes’ will show the root directory as top-directory (PR USB CD will show 'COMX', assuming the default root folder is used).
Case conversion (blue ellipse) – These settings are only used if USB CHAR(0), normal COMX character set or USB CHAR(1), lower case ‘default’ standard COMX characters on ‘SHIFT’ are selected. USB CHAR(0) is set as default. For these character sets the USB SW will convert any filename or directory name as specified: in lower case, upper case or capitalised. Default all filenames will be in lower case and directory names capitalised. When USB CHAR(2) or (3) are used the capitalisation is as typed on the COMX.
Back-up (magenta ellipse) – Select Yes / No, ‘Yes’ will result in creation of a back-up file for the specified commands with the format ‘nameNumber.type.bak’. So when saving a file ‘happiehap.comx’ the first back-up file created will be named happiehap1.comx.bak, second happiehap2.comx.bak etc. ‘No’ will result in a question on the COMX to overwrite the file Y/N when the file already exist on the PC.
The ROM files tab shows and allows changing of the SB ROM file details, not recommended to be changed.
The Backup tab shows all back-up (.bak) files (orange ellipse) in the specified directory (and if selected sub directories 'yes' in red ellipse). Pressing ‘Yes’ (blue ellipse) will delete all these files.
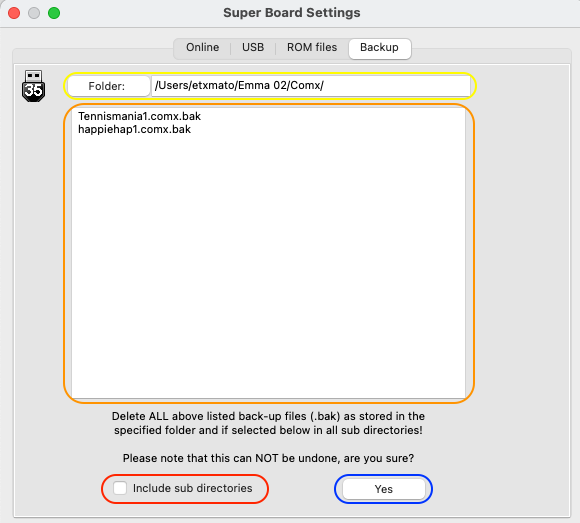
Note: The Backup tab will only be enabled when a COMX emulator is running.